【React】複数のProviderで1つのstoreを参照 & React+Reduxの実装基礎まとめ
今更ながらReduxをちゃんと学び始めて、ReactとReduxを連携した使い方がやっと分かってきました。
今回は少し特殊な例ですが、複数の Provider を使ってのコンポーネントの連携のやり方を紹介しつつ、サンプルを作りながらReact + Reduxの実装を振り返りたいと思います。
※「Actionとは」「Reducerとは」といったことには触れません。あくまでReduxとReactの連携について書いていきます。
複数のProviderを使うケース
通常、Provider は下記のようにルートコンポーネントをラップするように使い、アプリケーションに1つが望ましいと言われています。
render (
  <Provider store={store}>
    <App />
  </Provider>,
  document.getElementById('root')
);
ページ内で完全に独立したアプリケーションが2つ動いているといった状況でもない限り、単純にデバッグしにくくなるので複数のProviderコンポーネントを設置することは避けるべきです。 引用元:Reduxでコンポーネントを再利用する
しかし、htmlにThymeleafやsmartyなどのテンプレートエンジンを使ってサーバーサイドレンダリングしつつ、一部のコンポーネントをReactで作っていくような、ロジックが混在している場合、ルートコンポーネント1つの中に収めることが難しい場合があります。
そのような時は、解決策の一つとして複数のルートコンポーネントとProviderを使います。
といっても使い方は簡単です。
実際に、React + Reduxの基本をおさらいしながら簡単なサンプルを作ってみます。
サンプルアプリケーションの仕様
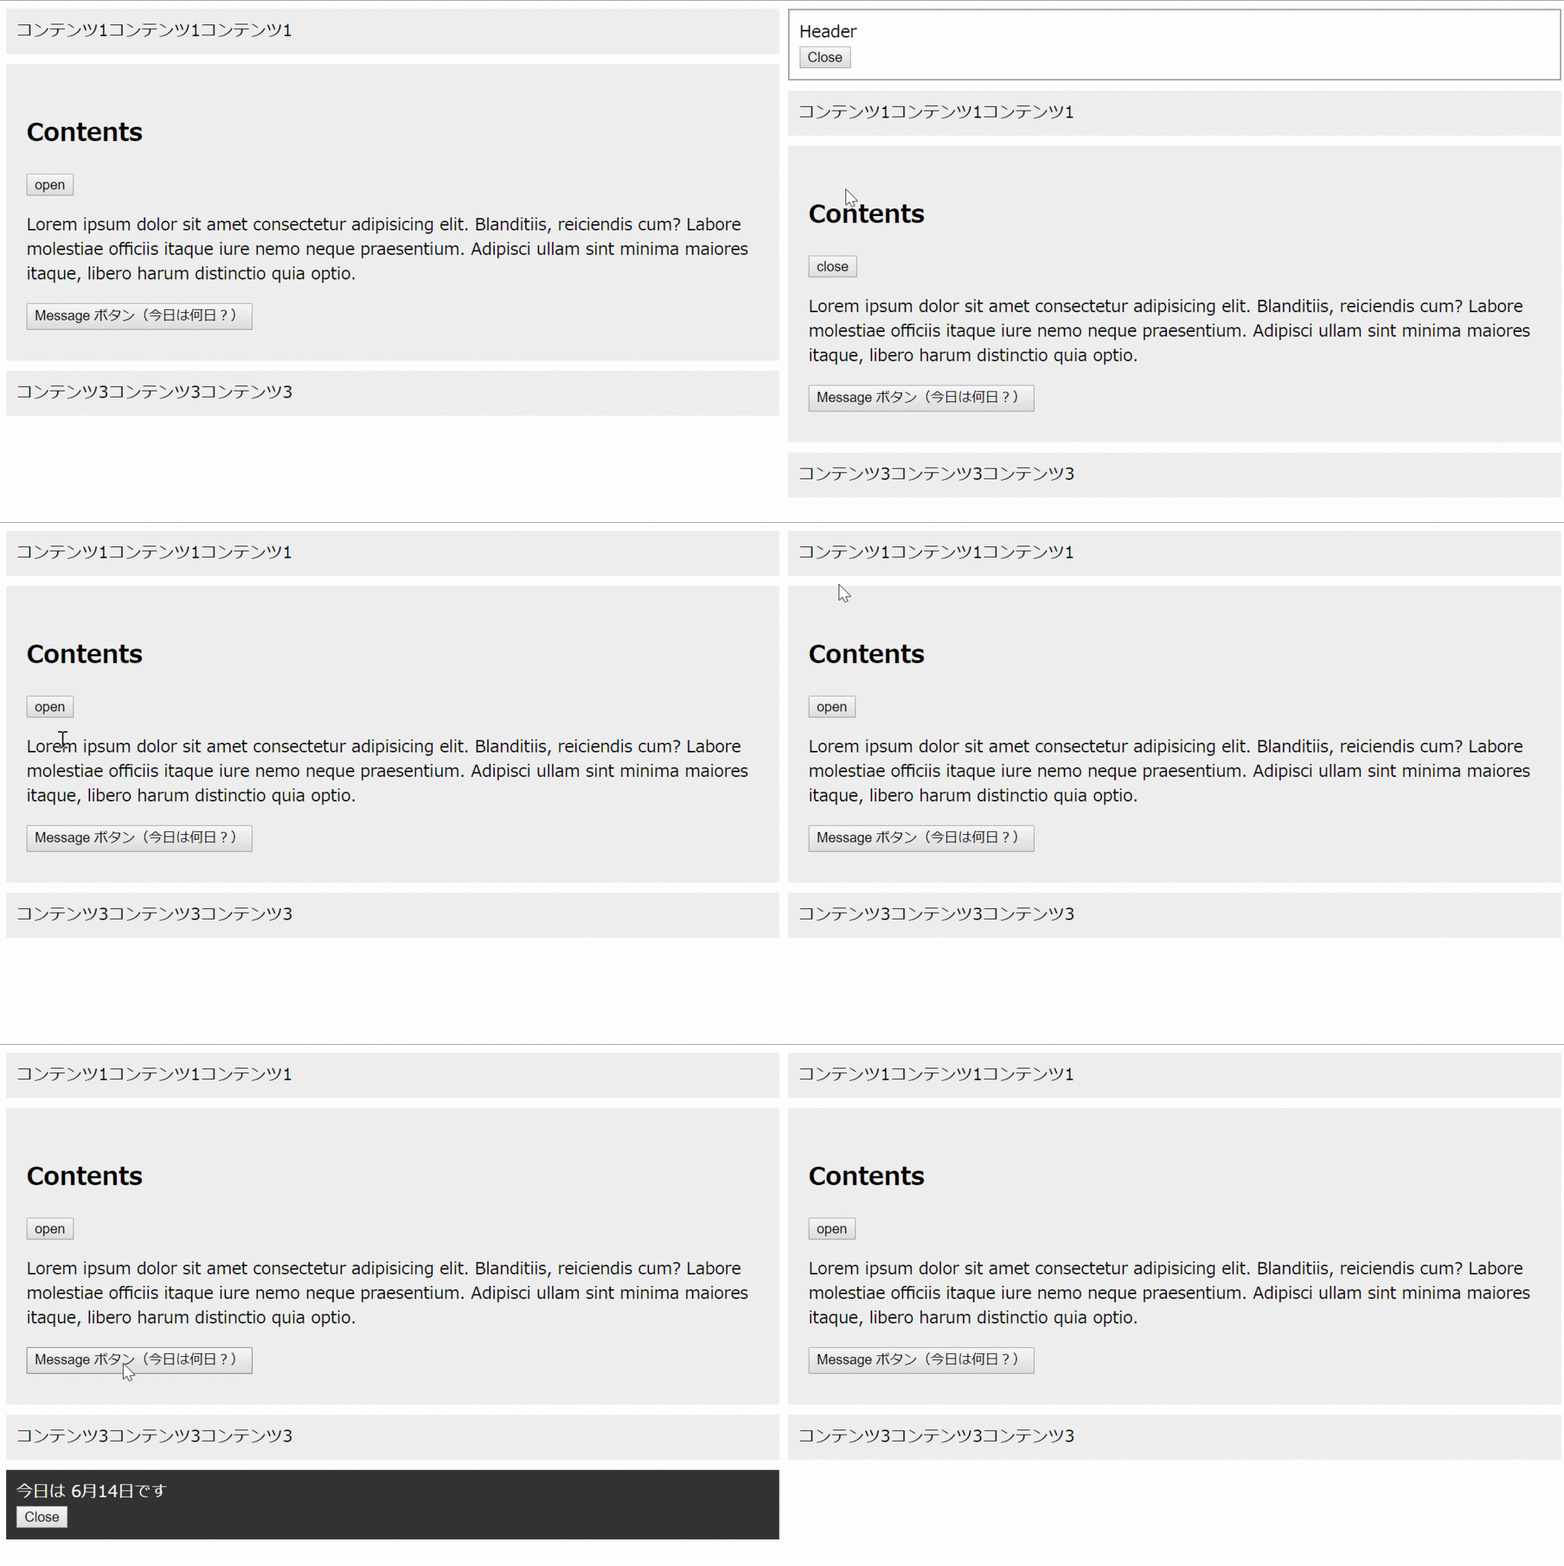
完成した状態

html
<header id="header"><!-- React.jsで作成 --></header>

<div id="contents1">
  <p>コンテンツ1コンテンツ1コンテンツ1</p>
</div>

<div id="contents2"><!-- React.jsで作成 --></div>

<div id="contents3">
  <p>コンテンツ3コンテンツ3コンテンツ3</p>
</div>

<div id="message"><!-- React.jsで作成 --></div>
挙動
#headerは初回非表示#contents2内にあるopenボタンと#header自身の中のボタンで表示/非表示が切り替えられる#headerが表示中は#contents2内にあるボタンの文言はcloseに変化する
#messageは任意の文言を表示するコンポーネントMessageボタンから呼び出すことができる- 呼び出されてから3秒後に消える(連続で呼び出されればずっと表示され続ける)
#message自身の中のボタンをクリックで消すこともできる
実装
コンポーネントへ分解
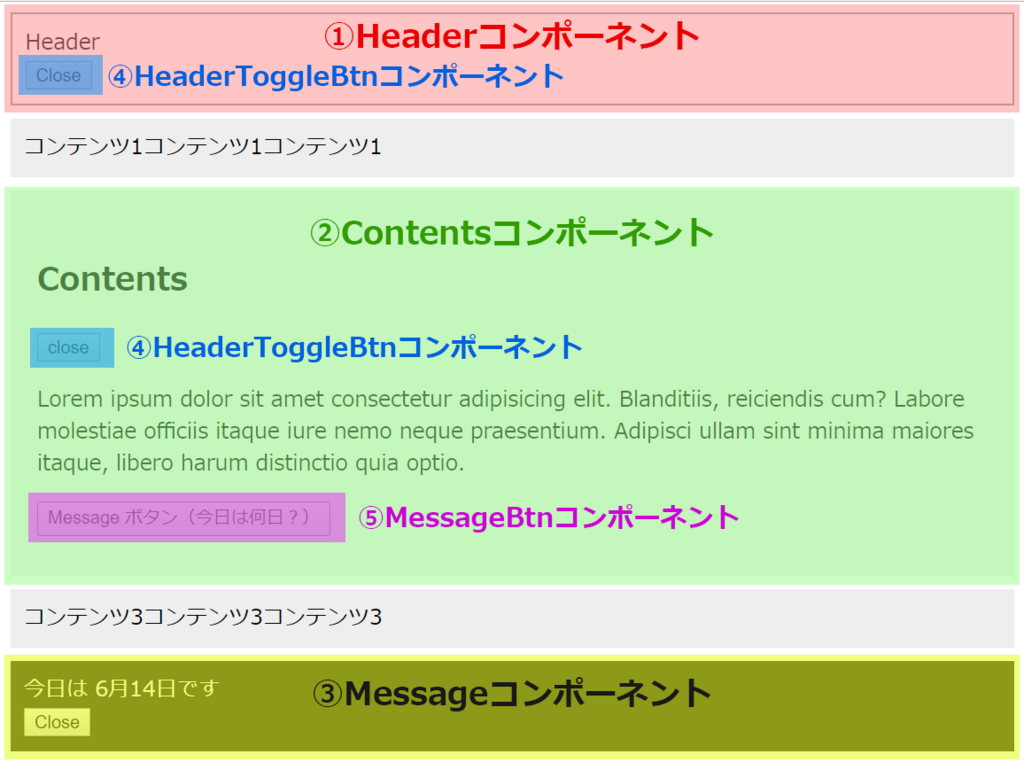
今回のサンプルは下記の5つのコンポーネントに分解します。
- Header
- Contents
- Message
- HeaderToggleBtn
- MessageBtn

ディレクトリ構成
最終的な構成は下記のようになります。
app
├ public
│ └ index.html
├ src
│ ├ actions
│ │ ├ header.js
│ │ └ message.js
│ ├ reducers
│ │ ├ header.js
│ │ ├ message.js
│ │ └ index.js
│ ├ components
│ │ ├ Header.js
│ │ ├ Contents.js
│ │ ├ Message.js
│ │ ├ HeaderToggleBtn.js
│ │ └ MessageBtn.js
│ └ index.js
├ ...
└ ...
storeのデザイン
storeの状態(state)の形を考えます。
下記のようなインターフェイスで実装していこうと思います。
{
  // Header コンポーネントの状態
  header: {
    isOpen: boolean; // 表示中か
  },
  // Message コンポーネントの状態
  message: {
    isShow: boolean; // 表示中か
    content: JSX.Element // 表示するコンテンツ(JSX)
  }
}
index.js(エントリーポイント)
本当はActionなどから作成するべきだと思いますが、今回のネックであるエントリーポイントから見てしまいます。
import React from 'react';
import { render } from 'react-dom';
import { createStore } from 'redux';
import { Provider } from 'react-redux';
import appReducer from './reducers';
import Header from './components/Header';
import Contents from './components/Contents';
import Message from './components/Message';

const store = createStore(appReducer);

render(
  <Provider store={store}>
    <Header />
  </Provider>,
  document.getElementById('header')
);

render(
  <Provider store={store}>
    <Contents />
  </Provider>,
  document.getElementById('contents2')
);


render(
  <Provider store={store}>
    <Message />
  </Provider>,
  document.getElementById('message')
);
ここでやっていることは下記のシンプルなことです。
各Providerから各コンポーネントへ同一のstoreを渡すことで一つのstoreをお互い参照することができるようになります。
actionの作成
Action を管理やすいように適度に分割して作っていきます。
▼ ./actions/header.js
// action type
export const OPEN = 'header/open';
export const CLOSE = 'header/close';

// action creator
export const open = (content) => ({
  type: OPEN
});
export const close = () => ({
  type: CLOSE
});
▼ ./actions/message.js
// action type
export const SHOW = 'message/show';
export const HIDE = 'message/hide';

// action creator
export const show = (content) => ({
  content,
  type: SHOW
});
export const hide = () => ({
  type: HIDE
});
Reducerの作成
次に Reducerを作ります。こちらも分割します。
▼ ./reducers/header.js
import * as headerActions from '../actions/header';

// 初期ステート
const initialState = {
  isOpen: false
};

export default function(state = initialState, action) {
  switch(action.type) {
    case headerActions.OPEN:
      return { isOpen: true }
    case headerActions.CLOSE:
      return { isOpen: false }
    default:
      return state;
  }
}
▼ ./reducers/message.js
import * as messageActions from '../actions/message';

// 初期ステート
const initialState = {
  isShow: false,
  content: null
};

export default function(state = initialState, action) {
  switch(action.type) {
    case messageActions.SHOW:
      return {
        isShow: true,
        content: action.content
      }
    case messageActions.HIDE:
      return {
        isShow: false,
        content: null
      }
    default:
      return state;
  }
}
どちらもシンプルです。
reducerを分割しているおかげで、お互いのstateに干渉することがありません。
もし分割していないと、別のstateは変更しないように上手くマージする必要があります。
▼ ./reducers/index.js
import { combineReducers } from 'redux';
import header from './header';
import message from './message';

export default combineReducers({
  header,
  message
});
分割したreducerをまとめています。
index.js とファイル名を付けるとhtmlみたいにディレクリ名で呼び出すことができて簡単です。
storeの作成
reducerを作ったのでstoreの作成ができるようになります。
先述の index.js から抜粋します。
import appReducer from './reducers';
// storeの作成
const store = createStore(appReducer);
コンポーネントの作成
storeの作成が終わったのでコンポーネントを作ります。
react-reduxは コンテナコンポーネント と プレゼンテーショナルコンポーネント に分離してコンポーネントを作成することを推奨しています。
コンテナコンポーネントは、storeと連携して、propsでプレゼンテーショナルコンポーネントへstateの情報を渡す役目です。JSXを書きません。
プレゼンテーショナルコンポーネントはpropsから得た情報をもとにviewを作る役目です。
今回はシンプルなサンプルなので分離を省略してstoreと連携しつつviewも作るコンポーネントにしてしまいます。
Headerコンポーネント
ヘッダーは表示/非表示の状態をstoreから参照しています。 そのためStoreの連携のためにreact-reduxのconnect関数を使ってコンポーネントを生成する必要があります。
また、ヘッダー内にはヘッダーを非表示にできるボタンがあります。
このボタンは閉じるだけの機能をつけて作成してもいいのですが、Contents コンポーネント内でヘッダー開閉のトグル機能を付けたボタン HeaderToggleBtn コンポーネントを使用するので、エコのためにそれを再利用します。
コードは下記になります。
▼ ./components/Header.js
import React from 'react';
import { connect } from 'react-redux';
import HeaderToggleBtn from './HeaderToggleBtn';

// css
const styles = {
  border: '1px solid #999',
  padding: 10,
  marginBottom: 10
};

const Header = (props) => {
  if (props.isOpen) {
    return (
      <div style={{...styles}}>
        Header <HeaderToggleBtn label={'Close'}/>
      </div>
    );
  }
  return null;
}

// storeのstateからheaderの情報だけpropsから得られるようにする
const mapStateToProps = state => state.header;
export default connect(mapStateToProps)(Header);
Contentsコンポーネント
Contentsコンポーネントは子コンポーネントに先述の HeaderToggleBtnコンポーネントと Messageコンポーネントを表示するMessageBtnコンポーネントを持っています。
Contentsコンポーネントは自身だけみるとstoreの情報を使っていませんのでstoreとの連携は必要ありません。
しかし今回、HeaderToggleBtnの文言をヘッダーが表示されている時は「Close」、非表示の時は「Open」に変える仕様です。
HeaderToggleBtnの文言はPropsで与える必要があります。
そうなるとヘッダーの状態を知る必要があるためstoreと連携します。
コードは下記になります。
▼./components/Contents.js
import React from 'react';
import { connect } from 'react-redux';
import HeaderToggleBtn from '../components/HeaderToggleBtn';
import MessageBtn from '../components/MessageBtn';

const Contents = (props) => {
  return (
  <div style={{ backgroundColor: '#eee', margin: '10px 0', padding: 10 }}>
    <h2>Contents</h2>
    {/* ヘッダーの状態によって文言を変える */}
    <HeaderToggleBtn label={props.isOpen ? 'close' : 'open'}/>
    <div>
      <p>Lorem ipsum dolor sit amet consectetur adipisicing elit. Blanditiis, reiciendis cum? Labore molestiae officiis itaque iure nemo neque praesentium. Adipisci ullam sint minima maiores itaque, libero harum distinctio quia optio.</p>
    </div>
    <MessageBtn />
  </div>
  );
};

// storeのstateからheaderの情報だけpropsから得られるようにする
const mapStateToProps = state => state.header;
export default connect(mapStateToProps)(Contents);
Messageコンポーネント
次に、任意の文字列を表示して3秒後に消えるコンポーネントを作成します。
このコンポーネントは、表示/非表示(isOpen)と表示する文言(content)をstoreの状態から得ているのでstoreとの連携が必要です。
また、コンポーネントの中には、自身を非表示にするボタンがあります。
このボタンをクリックして非表示にするには、storeの状態を更新する必要があるので、非表示にするActionをdispatchできるようにしなくてはいけません。
そのためにはstoreと連携し、connect関数の第二引数にmapDispatchToPropsという関数を与える必要があります。
これによりpropsからActionをdispatchするメソッドを得られるようになるので、これをボタンクリック時に発動するようにしてあげればOKです。
今回の場合は下記のようにconnect関数を実行しています。
// storeのstateからmessageの情報だけpropsから得られるようにする
const mapStateToProps = state => state.message;
// 非表示にするアクションをdispatchするメソッドをpropsから得られるようにする
const mapDispatchToProps = dispatch => ({
  hideMessage: () => dispatch(messageActions.hide())
});
export default connect(mapStateToProps, mapDispatchToProps)(Message);
その他のタイマー処理に関しては今回の話からずれるので省略しします。
Messageコンポーネントのコードは下記になります。
▼./components/Message.js
import React, { Component } from 'react';
import { connect } from 'react-redux';
import * as messageActions from '../actions/message';

const styles = {
  padding: 10,
  color: '#fff',
  backgroundColor: '#333',
};

class Message extends Component {
  constructor(props) {
    super(props);
    this.timerID = null;
    // bind
    this.handleClick = this.handleClick.bind(this);
  }

  /**
   * コンポーネントが更新された際の処理
   */
  componentDidUpdate() {
    if (!this.props.isShow) return;
    // キューが溜まるのを防ぐ
    if (this.timerID !== null) {
      window.clearTimeout(this.timerID);
    }
    this.timerID = window.setTimeout(() => { this.props.hideMessage(); }, 3000);
  }

  /**
   * closeボタンがクリックされた際に非表示にする
   */
  handleClick() {
    this.props.hideMessage();
  }

  render() {
    if (!this.props.isShow) { return null; }
    return (
      <div style={{ ...styles }}>
        {this.props.content} <button onClick={this.handleClick}>Close</button>
      </div>
    );
  }
}

// storeのstateからmessageの情報だけpropsから得られるようにする
const mapStateToProps = state => state.message;
// 非表示にするアクションをdispatchするメソッドをpropsから得られるようにする
const mapDispatchToProps = dispatch => ({
  hideMessage: () => dispatch(messageActions.hide())
});
export default connect(mapStateToProps, mapDispatchToProps)(Message);
これでHeader、Contents、Messageと大きなコンポーネントの作成が完了しました。
あとは残る小さなコンポーネントを作っていきます。
HeaderToggleBtnコンポーネント
HeaderコンポーネントとContentsコンポーネントに設置した、Headerの表示/非表示を切り替えるボタンのコンポーネントを作成します。
storeの状態を更新するボタンなので、当然storeとの連携が必要になります。
クリックしたら、headerの状態を見て、開いていたら閉じる、閉じていたら開くのactionをdispatchします。
そのためconnect関数にmasStateToProps mapDispatchToProps の両方を与える必要があります。
コードは下記になります。
▼./components/HeaderToggleBtn.js
import React, { Component } from 'react';
import { connect } from 'react-redux';
import * as headerActions from '../actions/header';

class HeaderToggleBtn extends Component {
  constructor(props) {
    super(props);
    this.handleClick = this.handleClick.bind(this);
  }

  /**
   * クリック時の処理
   */
  handleClick() {
    if (this.props.isOpen) {
      this.props.closeHeader();
    } else {
      this.props.openHeader();
    }
  }

  render() {
    return (
      <div>
        <button onClick={this.handleClick}>{this.props.label}</button>
      </div>
    );
  }
}

// storeのstateからheaderの情報だけpropsから得られるようにする
const mapStateToProps = state => state.header;
// 表示/非表示にするアクションをdispatchするメソッドをpropsから得られるようにする
const mapDispatchToProps = dispatch => ({
  openHeader: () => dispatch(headerActions.open()),
  closeHeader: () => dispatch(headerActions.close())
});

export default connect(mapStateToProps, mapDispatchToProps)(HeaderToggleBtn);
MessageBtnコンポーネント
最後のコンポーネントです。
Messageコンポーネントが表示する任意の文言を登録するコンポーネントを作ります。
文言をstoreの状態に保存するためstoreとの連携が必要です。
今回はサンプルのため、クリックしたら「今日の日付(〇月〇日)」を表示する機能にしています。
コードは下記になります。
▼./components/MessageBtn.js
import React, { Component } from 'react';
import{ connect } from 'react-redux';
import * as messageActions from '../actions/message';

class MessageBtn extends Component {
  constructor(props) {
    super(props);
    this.handleClick = this.handleClick.bind(this);
    const today = new Date();
    this.today = `${today.getMonth() + 1}月${today.getDate()}日`;
  }

  /**
   * クリックの処理
   */
  handleClick() {
    this.props.showMessage(<div>今日は {this.today}です</div>);
  }

  render() {
    return (
      <div>
        <button onClick={this.handleClick}>Message ボタン(今日は何日?)</button>
      </div>
    );
  }
}

// 文言を表示するactionをdispatchするメソッドをpropsから得られるようにする
const mapDispatchToProps = dispatch => ({
  showMessage: (content) => dispatch(messageActions.show(content))
});
export default connect(null, mapDispatchToProps)(MessageBtn);
まとめ
Providerを複数記述するというのは特殊な例ですが、完全なSPAでない場合にありえるケースかもしれません。
ルートコンポーネントごとにProviderでラップして同一のstoreを参照できるようにすれば基本的には通常のProvider1つの時の実装と変わらないかと思います。
何か誤りなどありましたらお気軽にコメントください。